Sunday, November 29, 2009

Pumpkin Soup in a Pumpkin Shell :)

I made this soup for Thanksgiving this year, and it turned out really tasty, as well as being super-fun to serve :)


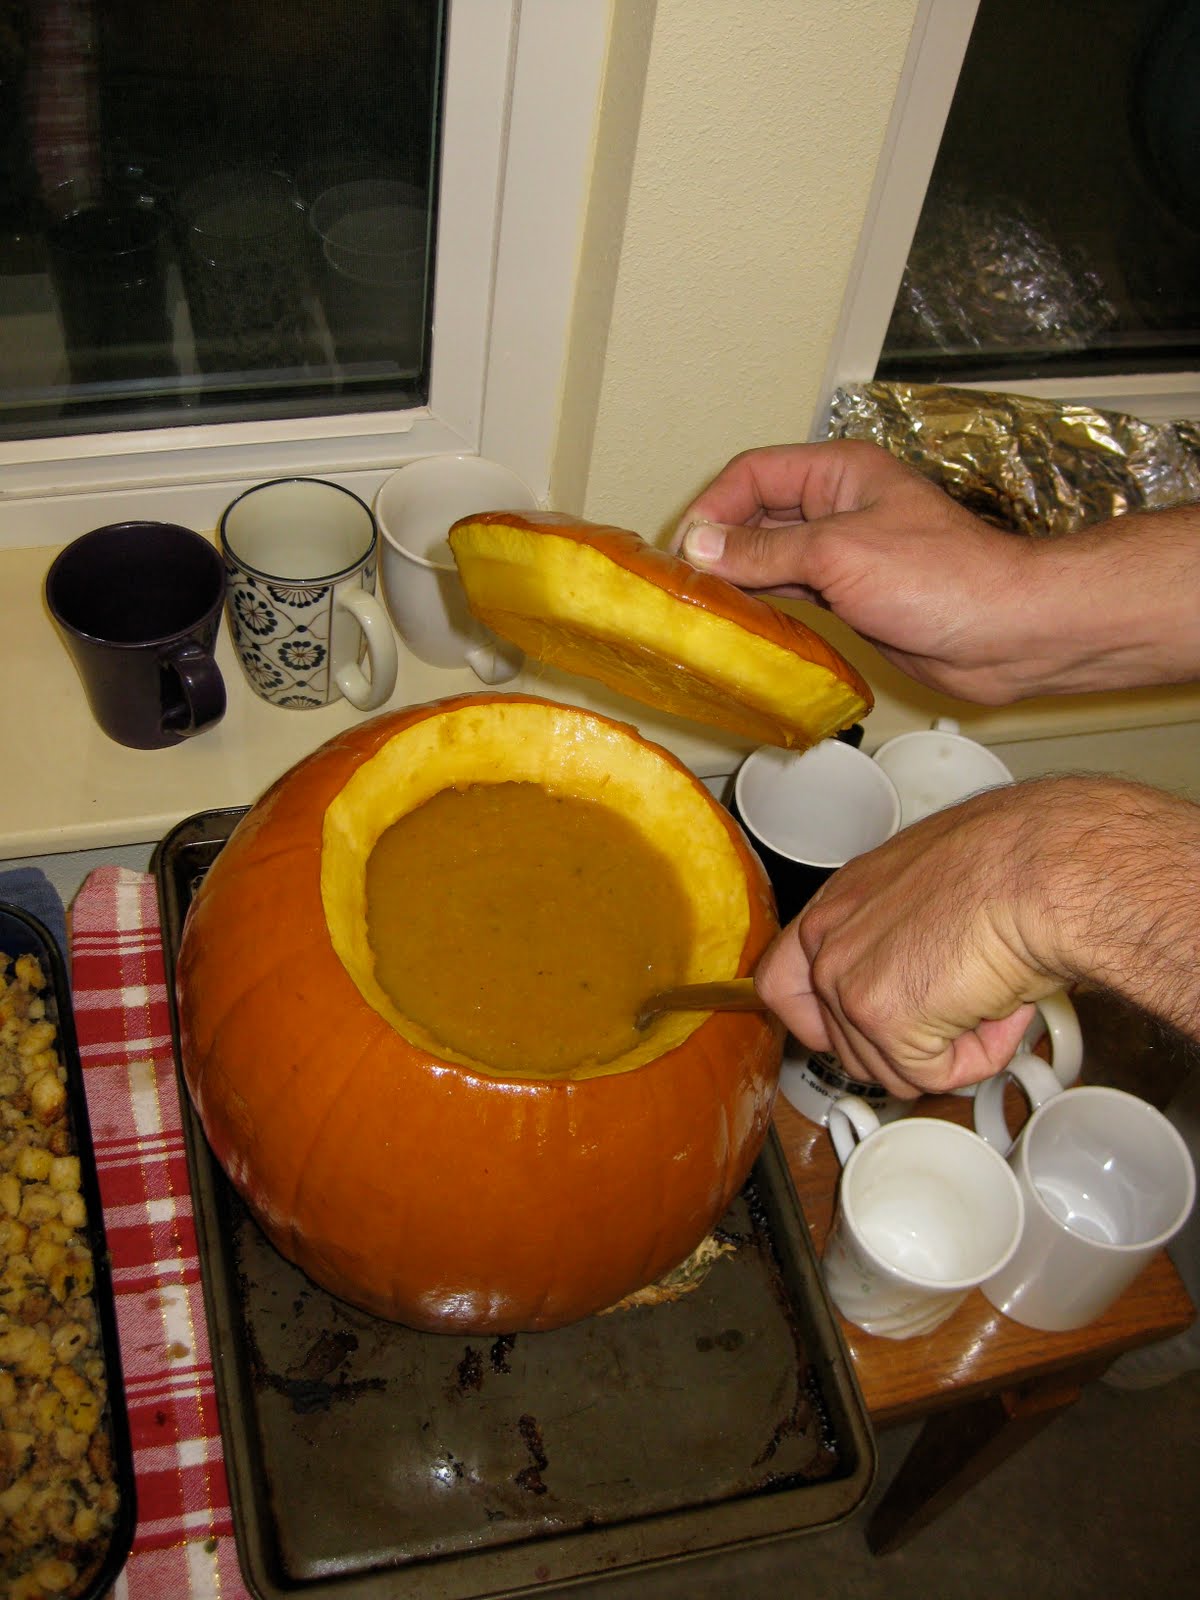
Elegant Pumpkin Soup Served in a Pumpkin Shell


1 large fresh pumpkin (about 12 inches in diameter) for serving the soup in.

2 1/2 cups fresh, cooked pumpkin or canned pumpkin

2 cups chicken broth + 1 cup milk (or 3 cups broth total for dairy-free)

4 tbsp. butter (or olive oil for dairy-free)

2 T. flour (rice flour for gluten-free)

1 large onion, chopped

2 stalks celery, diced

1 sprig of fresh thyme

1/2 tsp fresh marjoram, chopped fine

4 cloves garlic, minced or crushed

1/2 tsp. curry powder

1/4 tsp. ginger

1/4 tsp. nutmeg

1/8 tsp. chili powder

salt and pepper to taste

(a touch of honey or stevia to taste if it seems too bitter at the end)


Cut the top (one third) of your pumpkin to create a lid for your pumpkin serving bowl. Scoop out the seeds and strings, cleaning the inside well of any debris. Clean the seeds and place them on a cookie sheet. Sprinkle the seeds with a little salt. Roast in a 250°F oven until lightly golden brown. Set them aside to be used as a garnish. Heat the pumpkin shell and lid in a 250ºF oven while making the soup.


In a large soup pot, melt 2 T. of butter over a medium heat. Sauté the onion, celery and garlic, about 10 minutes. Add the pumpkin and 2 cups of chicken broth. Add the thyme sprig and other spices. Mix well. Simmer for an additional 20 minutes.


Meanwhile, in a separate sauce pan, melt the remaining 2 T. of butter over medium heat. Whisk in 2 T. flour and cook for several minutes, whisking constantly, until it starts to smell savory. Whisk in the milk (or the remaining cup of broth) a little at a time. Blend well. Cook for several minutes, until it starts to bubble and thicken, whisking periodically to keep it from sticking to the bottom. Remove from heat.


Remove thyme sprig from pumpkin mixture. Remove the mixture from the heat and puree in a blender. (Be careful to puree small amounts of the hot mixture with the blender top on to avoid having the mixture burst out of the blender.) Return the mixture to the pot.


Whisk the flour, butter, and milk/broth mixture into the pumpkin puree. Simmer for 5 minutes more. Pour soup into your hollowed-out pumpkin serving bowl. Serve the toasted pumpkin seeds on the side for garnish and plenty of fresh cracker pepper.


Enjoy! :)

Wednesday, November 18, 2009

the braided scarf


This is a really beautiful scarf that I thought you all would enjoy ... especially since there are video tutorials included.


Scarf knitting season is finally here! Maybe for some of you, like me, it never left. I am thrilled to be bringing Braided to you as a free pattern today. This is a fast and fun scarf that you can whip up on big needles in no time at all. It’s the perfect gift scarf for the holiday seasons ahead. The easy care/machine washable Outer yarn makes it even more appealing.

Here is some information you may want to know at a glance:

3 skeins of Spud & Chloë Outer (I used Soapstone #7200)

US size 17 needles or size to obtain gauge

US size 13 double-pointed needles, set of 4

Gauge: 1.75 sts per inch in stockinette stitch

The scarf involves ribbing (knit and purl stitches) and I-cord and braiding. If you can do those techniques you are all set to go!

Click here to download the pattern for Braided!

Look here for a series of video tutorials on how to knit Braided!

Enjoy.

Please note: When beginning a Rib Section after a Braided Section the yarn will be set to start a Row 2 or wrong side of the rib pattern.


I have embedded the first video here:

Thursday, October 15, 2009

hunting large game (survival tools)

My new favorite video! This was really cool to me. It is the ultra compound bow. This is certainly a weapon I want to know how to use for hunting.

Wednesday, October 7, 2009

Roasted Pepper Medley

This is a regular recipe I use often and I like to keep it on hand to spice-up on all sorts of things -- I like it best on salads. It really adds a lot of flavor! Enjoy!

Ingredients:

-2 Red bell peppers
-2 Yellow bell Peppers
-1/4 Cup of Olive Oil
-2 tsp salt
-1 Lemon (juiced)
-2 cloves of garlic minced

Wash peppers and bake in Oven at 350 degrees until they are puffed up and lightly browned (about 15 min). Remove and (without burning your fingers!) peel away the skin - it should peel away without too much difficulty. If it does not come off easily then it probably should be baked longer. After removing the skin, dice the peppers and place in a container (that preferably has a lid - otherwise the fridge will smell like peppers and garlic!) Add into the container the remaining ingredients and mix. Cover and place in the fridge. Let set and marinate for several hours. Keeps well for several days.

Wednesday, September 23, 2009

Essene Bread


Adapted from Wild Fermentation, by Sandor Ellix Katz

Sprout 3 cups whole grains:

1. Place whole grains in a wide-mouth gallon jar with a piece of mesh or
cheesecloth stretched over the mouth, secured with a rubber band.
2. Fill jar with water and soak grains for about 12-24 hours at room temperature.
3. Drain and discard the water.
4. Set the jar upside down in a measuring cup or small bowl. Ensure that the jar
rests safely above wherever the water drains. If the grains sit in water, they
will rot rather than germinate.
5. Rinse the sprouts with fresh water at least twice a day, morning and evening,
more often if possible. In hot weather especially, rinse often. The aim is to
keep the sprouts from drying out or molding.
6. You’ll know the grains have germinated when you see little tails emerging
from them. Use them within 2-3 days of germination for maximum sweetness.
Be sure to keep rinsing the sprouts at least twice a day.
Grind the sprouted grains with a blender or food processor. Leave some sprouted grains
whole, if you wish.


Add ¼ cups sourdough starter and ½ teaspoon sea salt.
Stir thoroughly. (note : I left out these two ingredients with mine)

Optional: add sunflower seeds, herbs, raisins, grated carrot.
Lightly oil a loaf pan and pour the mixture into the pan.
Cover with a clean cloth and leave to ferment in the pan at room temperature for a day or
two.

Dry the loaf in the oven at 200-degrees for about 4 hours. You can tell it’s ready when
the bread shrinks away from the sides of the pan.

If you are like me you might enjoy seeing someone else make this bread on a video : Sprouted Manna Bread (essene bread)

Tuesday, September 22, 2009

Edible Plants

I am super excited because here is a series of youtube videos on identifying wild edibles! I think this is so important for survival and even just to become familiar with your area. There are many books on this subject but I learned much more from watching these videos and it was fun!

Wild Edibles: Harvesting Wild Edibles in the Eastern Woodlands series

I am embedding the first one here - but follow the above link to view the series.